Computer Arts Creative Salary Survey 2015

Complete CA's Creative Salary Survey 2015 to measure yourself against the rest of the industry...

Are you paid enough? And if not, what can you do about it? It's a thorny, complex issue, and one that will be explored in depth as part of Computer Arts' upcoming Money Special – on sale 20 August.
As part of our research, we are conducting an anonymous survey of wages in the global design industry – and are inviting Creative Bloq readers to take part.

How to get a pay rise

This isn't only about what you're currently paid, either. What's unique about this salary survey is that we're also investigating who has enjoyed a pay rise recently – and, crucially, why.
So please take a few minutes to complete the short survey below as accurately as you can, and see how your situation compares to your peers when we publish the results next month.
The results of the survey will be anonymous. The information you supply in connection with this survey will be used solely for the purpose of undertaking the survey, and shall not be used for marketing purposes.
Best graphic designing courses in delhi
Best 3d animation courses in delhi
3d animation courses in delhi
Read More
Section 1: Shaping the Hair
The liquify tool will allow you to push and pull pixels. This is really great, but you never want to do this directly on the background layer. So, duplicate the background layer and work from that one. Then go to Filter – Liquify to bring up the Liquify dialogue.
The only tool you really need to use for shaping hair with Liquify is the Forward Warp Tool. It’s found in the upper left corner. You will notice there are many options for size, pressure, density, etc. (if you aren’t seeing those options, click on Advanced). For hair, we use a density and pressure of about 25. The size you should use varies greatly from photo to photo; you don’t want it to be too small and make a harsh warp trail, but you also don’t want it too large because it will move much more than you’d like. Play around with what size works best for the hair in your photo. Ctrl/Cmd + Z is your friend here!
We use this forward warp tool to push the hair down into a more orderly style. It makes the look a little more cohesive and “put together” looking.
As you can see, the liquify tool does the majority of the work!
Section 2: Clean Up
Next up is clean up! First, create a new layer. we have some residual hair floating above the model’s head, so we use the clone stamp tool to get rid of that. This works for flyaways as well! The hardness of our brush is around 85% so that it’s not too fuzzy.
To clean up the little light hairs that cross over dark hair and look distracting, create a new layer and use the clone stamp tool. The difference here is: change the Blending Mode from Normal to Darken. This magic technique gets rid of those light areas as soon as you paint over them! This can be tedious, but you can spend as much or as little time on this as you want.
Section 3: Fill in Blank Areas
Create a new layer and use the clone stamp tool to paint in another copy of just the hair. Then, bring in that new hair over on top of the actual hair. Then, add a layer mask and paint with white in the area that you want to fill in.
By default, layers and layer masks are linked together. But, you can unlink the two and move each one separately. To do this click on the little chainlink that appears between the layer and the mask. Then, select just the layer and you will see how easy it is to move just the new hair around!! You can even use the Transform tool (Ctrl/Cmd + T) to rotate or adjust the hair inside of that blank area.
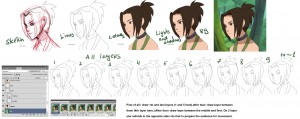
One more technique for styling the hair is creating more copies of the hair with different blend modes.
How to Style Hair in Photoshop, Photoshop Tutorials, Style Hair in Photoshop, How to Style Hair in Photoshop, How to Style Hair in Photoshop, Change Style Hair in Photoshop, Tutorial Changing Style Hair in Photoshop, Creating Style Hair in Photoshop, Photoshop Tutorial How to Changing Style Hair in Photoshop, Photoshop Tutorials, Photoshop Tutorial, photoshop Style Hair, Style Hair adder, photoshop remove Style Hair in Photoshop, photoshop Style Hair, Style Hair photoshop tutorial, stubble photoshop, Altering Style Hair in PhotoshopHow to Style Hair in Photoshop, Photoshop Tutorials, Style Hair in Photoshop, How to Style Hair in Photoshop, How to Style Hair in Photoshop, Change Style Hair in Photoshop, Tutorial Changing Style Hair in Photoshop, Creating Style Hair in Photoshop, Photoshop Tutorial How to Changing Style Hair in Photoshop, Photoshop Tutorials, Photoshop Tutorial, photoshop Style Hair, Style Hair adder, photoshop remove Style Hair in Photoshop, photoshop Style Hair, Style Hair photoshop tutorial, stubble photoshop, Altering Style Hair in Photoshop
How to Style Hair in Photoshop, Photoshop Tutorials, Style Hair in Photoshop, How to Style Hair in Photoshop, How to Style Hair in Photoshop, Change Style Hair in Photoshop, Tutorial Changing Style Hair in Photoshop, Creating Style Hair in Photoshop, Photoshop Tutorial How to Changing Style Hair in Photoshop, Photoshop Tutorials, Photoshop Tutorial, photoshop Style Hair, Style Hair adder, photoshop remove Style Hair in Photoshop, photoshop Style Hair, Style Hair photoshop tutorial, stubble photoshop, Altering Style Hair in Photoshop
How to Style Hair in Photoshop, Photoshop Tutorials, Style Hair in Photoshop, How to Style Hair in Photoshop, How to Style Hair in Photoshop, Change Style Hair in Photoshop, Tutorial Changing Style Hair in Photoshop, Creating Style Hair in Photoshop, Photoshop Tutorial How to Changing Style Hair in Photoshop, Photoshop Tutorials, Photoshop Tutorial, photoshop Style Hair, Style Hair adder, photoshop remove Style Hair in Photoshop, photoshop Style Hair, Style Hair photoshop tutorial, stubble photoshop, Altering Style Hair in Photoshop.
Read More

Animation is also Art

By Andres Riofrio;

  The greatest misconception about art is what is considered art. Currently, in order to be an artist you have to be a musician, a painter, a sculpture, a dancer, or something along those lines. You are not considered to be an artist if you are a film animator, a 3D modeler or a virtual designer. However, that is a weak and limiting definition of art.
Art is about creating something unique, it’s about expressing your view of the world in a different way. So, why is animation not widely considered to be an art form? When someone animates something they are creating something new and creative. Animation requires as much creativity as it does technical skill. Take for example the films Hugo, and Disney’s animated films. The majority of the work for the films was all done on a computer. Sure, there was story writing and artist drawings of the scenes, but creation of the characters, sets and environments was mostly done through using a CPU.
"The Animation Process" by Osato-kun (deviant art.com)
“The Animation Process” by Osato-kun (deviant art.com)
The animators created something new. They created a character and gave life to it by using computers. It took someone hours simply to create Hugo’s eyes. Who ever animated and designed Mufasa’s death in the lion king, probably spent days thinking about the colors and the proper movement in order to bring that heart felt scene to life.
Art does not have to be limited to the fine arts. Art is anything that comes into existence through someone’s creativity and work. What is considered art should not be limited to the “classical” arts per se.


Read More
Next PostNewer Posts Previous PostOlder Posts Home